You might want to kick user out of QuickBooks when they are no longer active or part of the team. Some issues, such as the accountant or user logging into the company file and not logging out or if they have already logged into the company file from a different workstation, are also possible reasons you want to take such action.
Regardless of your situation, we will help you remove the user from QuickBooks Desktop and the Online version. Even if you follow the process carefully, network issues might prevent you from successfully logging users out of QuickBooks. This detailed guide will cover different ways to force all users to log out of QuickBooks.
 | Although logging a user out of QuickBooks is quite easy, issues can still arise, causing the process to fail. In such situations, it’s recommended to seek assistance from industry experts. Dial 1855-546-5024 and connect with a QuickBooks ProAdvisor for help now! |
Learn How to Kick User Out of QuickBooks [Desktop & Online]
The QuickBooks Desktop and Online versions offer different ways to remove a user from QuickBooks. This section covers foolproof steps to help you log off a user in both QuickBooks Desktop and Online. Let’s get started:
QuickBooks Desktop
First, ensure you are using QuickBooks with the administrator rights. Now, follow these steps to log a user off from a QuickBooks company file:
- Navigate to the Company menu and click on Chat with a coworker to launch the QuickBooks Messenger.
- Choose Close Company File for Users from the Action dropdown menu.

- Look for the user you want to log off and select it.
- Click on Close Company File.
- Now, select Yes in the confirmation window.
QuickBooks Online
QuickBooks Online offers two ways to remove users: either change the user’s roles or permissions or delete them permanently. Let’s find out how to perform both:
Changing user roles
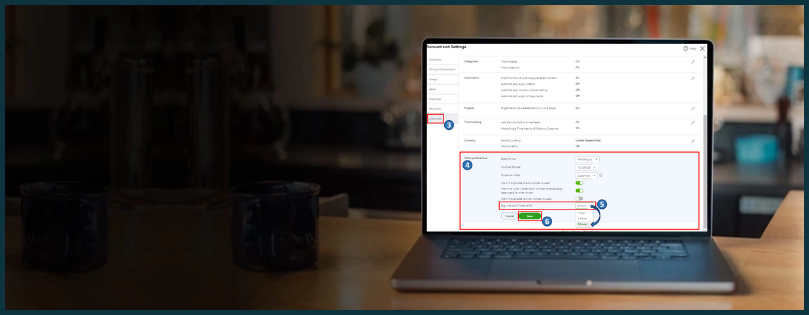
- Ensure you are logged in QuickBook as a primary or admin user.
- Now, go to Settings and then select Manage Users.

- Look for the user you want to edit and then select Edit in the Action column.
- Change the roles and permissions for the user from the Roles dropdown menu.
- Know that you can’t edit the Time tracking only roles. So, rather than editing, delete them and add them again with new or correct roles.
- Choose the account management settings and edit them.
- Finally, click Save.
Now, ask the user to sign out and back into QuickBooks Online to review the changes.
Delete a User
Following the below steps will delete the user permanently, though you can still check the audit log to view their history.
- Choose Manage Users from the Settings menu.

- Select the Ellipsis icon on the user you want to delete and then click Delete.
- In the pop-up window, click on Delete user to confirm.
If you are not the Primary Admin
Only the Master Administrator or Primary Administrator contact can remove users from QuickBooks. So, you must inform the Master Admin to remove a user from your company. To do so, follow these steps:
- Open QuickBooks and sign in to My Account.

- You will be sent to the Manage your QuickBooks page. Now, choose the product and service you want to change.
- Before moving further, ensure your account is correct.
- Move down to the Authorized Users section.
- Choose the name of the users you want to remove or delete.
- Click on Remove User.
- If the user hasn’t taken action in the invitation email, you will see Cancel Invite.
- Finally, click Remove.
After following these steps, we hope you have successfully removed users from the version of QuickBooks you use. However, you might fail during the process due to network issues or session timeout. To handle such issues, find out the steps you must perform before attempting to remove the users again in the next section.
Highly Recommended: QuickBooks Migration Failed Unexpectedly! Solutions Explained
Try This If You Fail to Force Logout All Users in QuickBooks
You may have faced difficulties trying to log all users out of QuickBooks. But no need to worry; we have covered the appropriate steps you must follow to fix these issues, along with different methods for both QuickBooks Desktop and Online.
In QuickBooks Desktop
Issues when logging out inactive users in QuickBooks Desktop can occur due to interruptions caused by background processes or not logging out from QuickBooks Messenger. Let’s find suitable fixes for these and other possible reasons:
1. End the QuickBooksMessagine Process from the Task Manager
When logging out of the company file, the QuickBooks messaging app might not close correctly. You can close it without restarting your computer by ending all the QuickBooks Messenger processes. Here’s how to do this:
- Press the Ctrl + Del + Alt keys simultaneously on your keyboard to launch the Task Manager.

- Move to the Process tab and look for the multiple instances of QuickBooksMessagine (32-bit).
- Select each QuickBooks Messenger process and click Delete to terminate them.
- Once done, close Task Manager and log into QuickBooks.
- Ensure the user you want to log off is no longer logged in.
Are you unable to log out inactive users using QuickBooks Messenger? If so, proceed to the next solution.
2. Log Off as a User to Close the Company File on the Server
If you can’t log out as a user with administrator rights, use the user credentials to log in to QuickBooks and log out from their end. Follow the instructions below to do this:
- Launch QuickBooks Desktop on your server computer.
- Select Open or Restore Company in the File menu.

- Choose Open a Company File and click Next.
- Now, look for your company file and select it.
- Select the Open file in multi-user mode checkbox and click Open.
- Sign in to your company file with the normal username and password.
- Finally, select File and Close Company/Log off to close the company file on the server.
If you can’t obtain the user credentials or the steps don’t resolve the issue, proceed to the next solution.
Handpick Article: Leading Reasons Why QuickBooks Not Responding When Opening Company File
3. Restart the QuickBooks Database Server Manager
You might fail to log a user out of the company file due to network connectivity issues when hosted on a multi-user network or with the QuickBooks Database Server Manager. Therefore, it is recommended that the tool be restarted to ensure there are no network connectivity issues and that you can perform the activity, such as removing users seamlessly.
- Launch the QuickBooks application on your server computer.
- Choose Open or Restore Company in the File menu.
- Click on Open a Company File.
- Now, find your company file and choose it. Then, select Next.
- Ensure to mark the Open file in multi-user mode checkbox and then click Open.
- Sign in to your company file as an admin.
- Select Close Company/Log off from the File menu. It will close the company file on your server computer.

- Now, press the Windows logo key to open the Windows Start menu.
- In the search bar, type ‘Database’ and open QuickBooks Database Server Manager.
Still unable to log users out of QuickBooks? If so, proceed with the next troubleshooting solution.
4. Reset the Admin Password and then Try Again
Resetting the admin password can refresh your admin rights, which might have been disrupted due to network connectivity or server issues. Learn how to reset your password by following these steps:
- Select Users from the Company menu.
- Choose Set Up Users and Roles.
- Click on the Admin user and hit Edit.

- Enter the new password and then confirm it.
- Choose a challenge question and type your answer for security reasons.
- Finally, click OK.
If the issue persists and you cannot remove users, move to the next troubleshooting solution below.
You can’t Skip: Easy Steps for Fixing the Windows Firewall Issues in QuickBooks Desktop
5. Run the Quick Fix My Program
Damage or issues with your QuickBooks program can be a possible reason your actions aren’t taking effect. Let’s repair the QuickBooks program by running the QuickBooks Fix My Program utility:
A. Download and Install QuickBooks Tool Hub
- Exit QuickBooks.
- Go to Intuit’s official site and download the most recent version of QuickBooks Tool Hub (1.6.0.3).
- Save the file where you can quickly locate it, such as your Download folder or Windows desktop.
Note: If you have already installed Tool Hub, check which version you have on the Home tab. The version will be at the bottom.
- Locate the file you recently downloaded (QuickBooksToolHub.exe) and double-click on it to open.
- Keep following the instructions on your screen and accept the product’s terms and conditions.
- Once done, open Tool Hub by double-clicking its icon on the Windows desktop.
Note: If you can’t find the icon, manually search for Tool Hub in Windows search and select the program.
B. Make Use of Quick Fix My Program
Running the Quick Fix My Program will close any processes that QuickBooks uses and run a quick repair on your program.
- Choose Program Problems from the left pane QuickBooks Tool Hub.
- Select Quick Fix My Program.
- Launch your QuickBooks Desktop and open your company file again.
- Now, reattempt to kick the user out of QuickBooks.
If you still have trouble logging out users from QuickBooks, consider the next troubleshooting solution.
6. Utilize the Verify and Rebuild Tool
Damage or corruption to the company file can prevent you from performing operations, including logging off a user from QuickBooks. Follow the instructions below to repair such data issues and continue working with QuickBooks:
Verify the data
- In QuickBooks, go to the Window tab and select Close All.
- Go to the File menu at the top and hover over Utilities.
- Choose Verify Data. Now, if you see:
- QuickBooks detected no problems with your data: it shows your data is clean, and there’s no need to rebuild it.
- An unknown error message: check the related article on our website.
- Your data has lost integrity: Data damage has been found, and you need to rebuild it to restore data integrity.
Rebuild the data
- Select Utilities from the File menu and then click Rebuild Data.
- Before rebuilding, QuickBooks will ask you to create a company file backup to ensure your data is safe and protected. Click OK to proceed.
- Choose the location where you want to save the backup file, then click OK. Also, ensure you are not replacing an existing backup. In File Name, enter a new name and then click Save.
- Once you get the Rebuild has completed message, click OK.
- Navigate to the File menu and choose Utilities. Then, select Verify Data to check for any additional damage.
- If you find more damage after verifying the data, you must fix it manually. For instructions on how to fix the error(s) shown in the qbwin.log file, search for the error(s) on this website.
- If there’s no error, restore your recent backup. Select Open or Restore Company from the File menu.
Note: Ensure not to replace your existing company file. Since the backup was created, you must enter information into your company file again.
In QuickBooks Online
Common browser issues can prevent you from performing actions or logging users out of QuickBooks. This section covers the steps you should follow to resolve these issues. Ensure you follow them carefully:
1. Restart your Browser
Restarting your browser will refresh it and resolve issues you might face due to network timeout errors or other common problems when logging off a user in QuickBooks.
Move to the next solution if this doesn’t help you.
2. Incognito or Private Browser
Saved history or other browser data can directly impact your operations in QuickBooks Online, such as logging off a user. To ensure your junk files in the browser don’t interfere with your current operations, open QuickBooks in a private or incognito window:
Here’s how to open QuickBooks Online in the private window:
Google Chrome:
- Windows: Press Ctrl + Shift + N.
- Mac: Press Command + Shift + N.
Mozilla Firefox:
- Windows: Press Ctrl + Shift + P.
- Mac: Press Command + Shift + P.
Microsoft Edge:
- Windows: Press Ctrl + Shift + P.
- Mac: Press Command + Shift + P.
Safari:
- Mac: Press Command + Shift + N.
If you are still facing issues logging off a user, proceed with the troubleshooting solution below.
3. Clear the Browser’s Cache and Cookies
Excessively stored browser caches and cookies can become corrupted, leading to issues with online operations. To prevent these problems, clear your browser’s cache and cookies before attempting to remove a user from QuickBooks. Here’s how:
A. Clearing the browsers’ cache
Firefox
- In Firefox, click on the Menu icon at the top right corner.
- Choose Settings from the dropdown and then click on Privacy & Security.
- Select Clear Data under Cookies and Site Data. The Clear browsing data and cookies dialog will open.
- From the dropdown, choose Everything next to When:.
- Ensure that only the Temporary cached files and pages option is checkmarked.
- Then, select Clear.
- Close the page, and it will automatically save the changes made.
Google Chrome
- Open Google Chrome, and click the More icon at the top right.
- Select Delete browsing data.
- Choose the time range to clear data, such as the Last hour or All time.
- Select the types of information you would like to remove.
- Then, click Delete data.
Safari for Mac
- Open Safari on your Mac and select History.

- Choose Clear History and then click the pop-up menu.
- Select the time range of how far back you want to clear the browsing data.
Safari for iPad and iPhone
- Open Safari and go to Settings.
- Select Clear History and Website Data.
- Choose History, Cookies, and other Browsing data to clear.
Microsoft Edge
- Launch your Microsoft Edge browser.
- Select Settings and more, and then choose Settings.
- Now, click on Privacy, search, and services.
- Select the Clear browsing data section and click Clear browsing data now.
- Select Choose what to clear.
- Under Time range, choose the time range to clear data from the dropdown menu.
- Select the type of data you want to clear and hit Clear now.
B. Clear Intuit-specific cookies from your browser
Google Chrome
- Click on the More icon from the top right corner.
- Go to Settings and then click on Privacy and Security.
- Choose Cookies and other site data.
- Select See all cookies and site data.
- Type Intuit in the search bar to find the Intuit-specific cookies.
- Now, click Remove all shown or tap the Trash icon.
- Restart your browser to ensure the changes can take effect.
Mozilla Firefox
- Open your Mozilla Firefox browser and select the Menu icon.
- Choose Settings from the dropdown and click on Privacy & Security.
- Under Cookies and Site Data, click on Manage Data.
- Type Intuit in the search field and press Enter to find the Intuit-specific cookies.
- Select Remove all shown and then click Save changes.
- Finally, restart Mozilla Firefox to ensure the changes are saved.
Safari
- Open Safari and select Safari beside the Apple icon at the top left.
- Go to Preferences and move to the Privacy tab.
- Click on Manage Website Data.
- Type Intuit in the search bar to find the Intuit-specific cookies.
- Choose Remove All and hit on Remove Now.
- Then, select Done.
- Restart Safari to ensure the changes are saved.
Finally, try again to force logout of all users in QuickBooks.
Summary
Now that you’ve followed this comprehensive guide on how to kick user out of QuickBooks, along with troubleshooting steps for both Desktop and Online versions, you should be well-equipped to handle the process. However, if you still have any queries or issues, feel free to contact our support team for assistance. Dial 1855-546-5024 and connect with a QuickBooks ProAdvisor now!
Frequently Asked Questions
Yes, QuickBooks Desktop allows you to log a user out anytime. You might need to take this action when a user is inactive or is no longer part of your team. QuickBooks provides a feature that enables the admin to remove or permanently delete users as needed.
You can restrict users by simply modifying their roles and permissions and setting them to “None.” Apart from this, you can also permanently delete a user from the Manager Users account in QuickBooks Online.
To remove the user from QuickBooks Messenger, go to the Company menu> Chat with a Coworker> Close Company File for Users from the Actions dropdown menu. Choose the user you want to remove> Close Company File. Click Yes to remove the user.
Sending an invitation to add a user in QuickBooks Online is easy. Go to Settings> Manage users> Add user and then enter the user’s name and email address. Choose the role you want to assign to the user from the Roles dropdown. To manage these roles, select the Account Management settings. Finally, click Send invitation.
